| 일 | 월 | 화 | 수 | 목 | 금 | 토 |
|---|---|---|---|---|---|---|
| 1 | 2 | 3 | 4 | 5 | 6 | 7 |
| 8 | 9 | 10 | 11 | 12 | 13 | 14 |
| 15 | 16 | 17 | 18 | 19 | 20 | 21 |
| 22 | 23 | 24 | 25 | 26 | 27 | 28 |
- swagger
- datepicker
- menutab
- 어노테이션
- Python
- reflection
- FACTORY
- 현대 IT&E
- URN
- udp
- di
- Dialog
- OOP
- tcp
- AndroidStudio
- Kotlin
- Android Studio
- url
- 객체지향프로그래밍
- OpenAPI
- 코드업
- 2024-08-21
- 채용확정형
- IOC
- 2024-08-20
- uri
- 기초100제
- fontstyle
- http method
- Factory Method Pattern
dingdong coding
[ Android / Kotlin ] Custom Dialog 만들기 본문
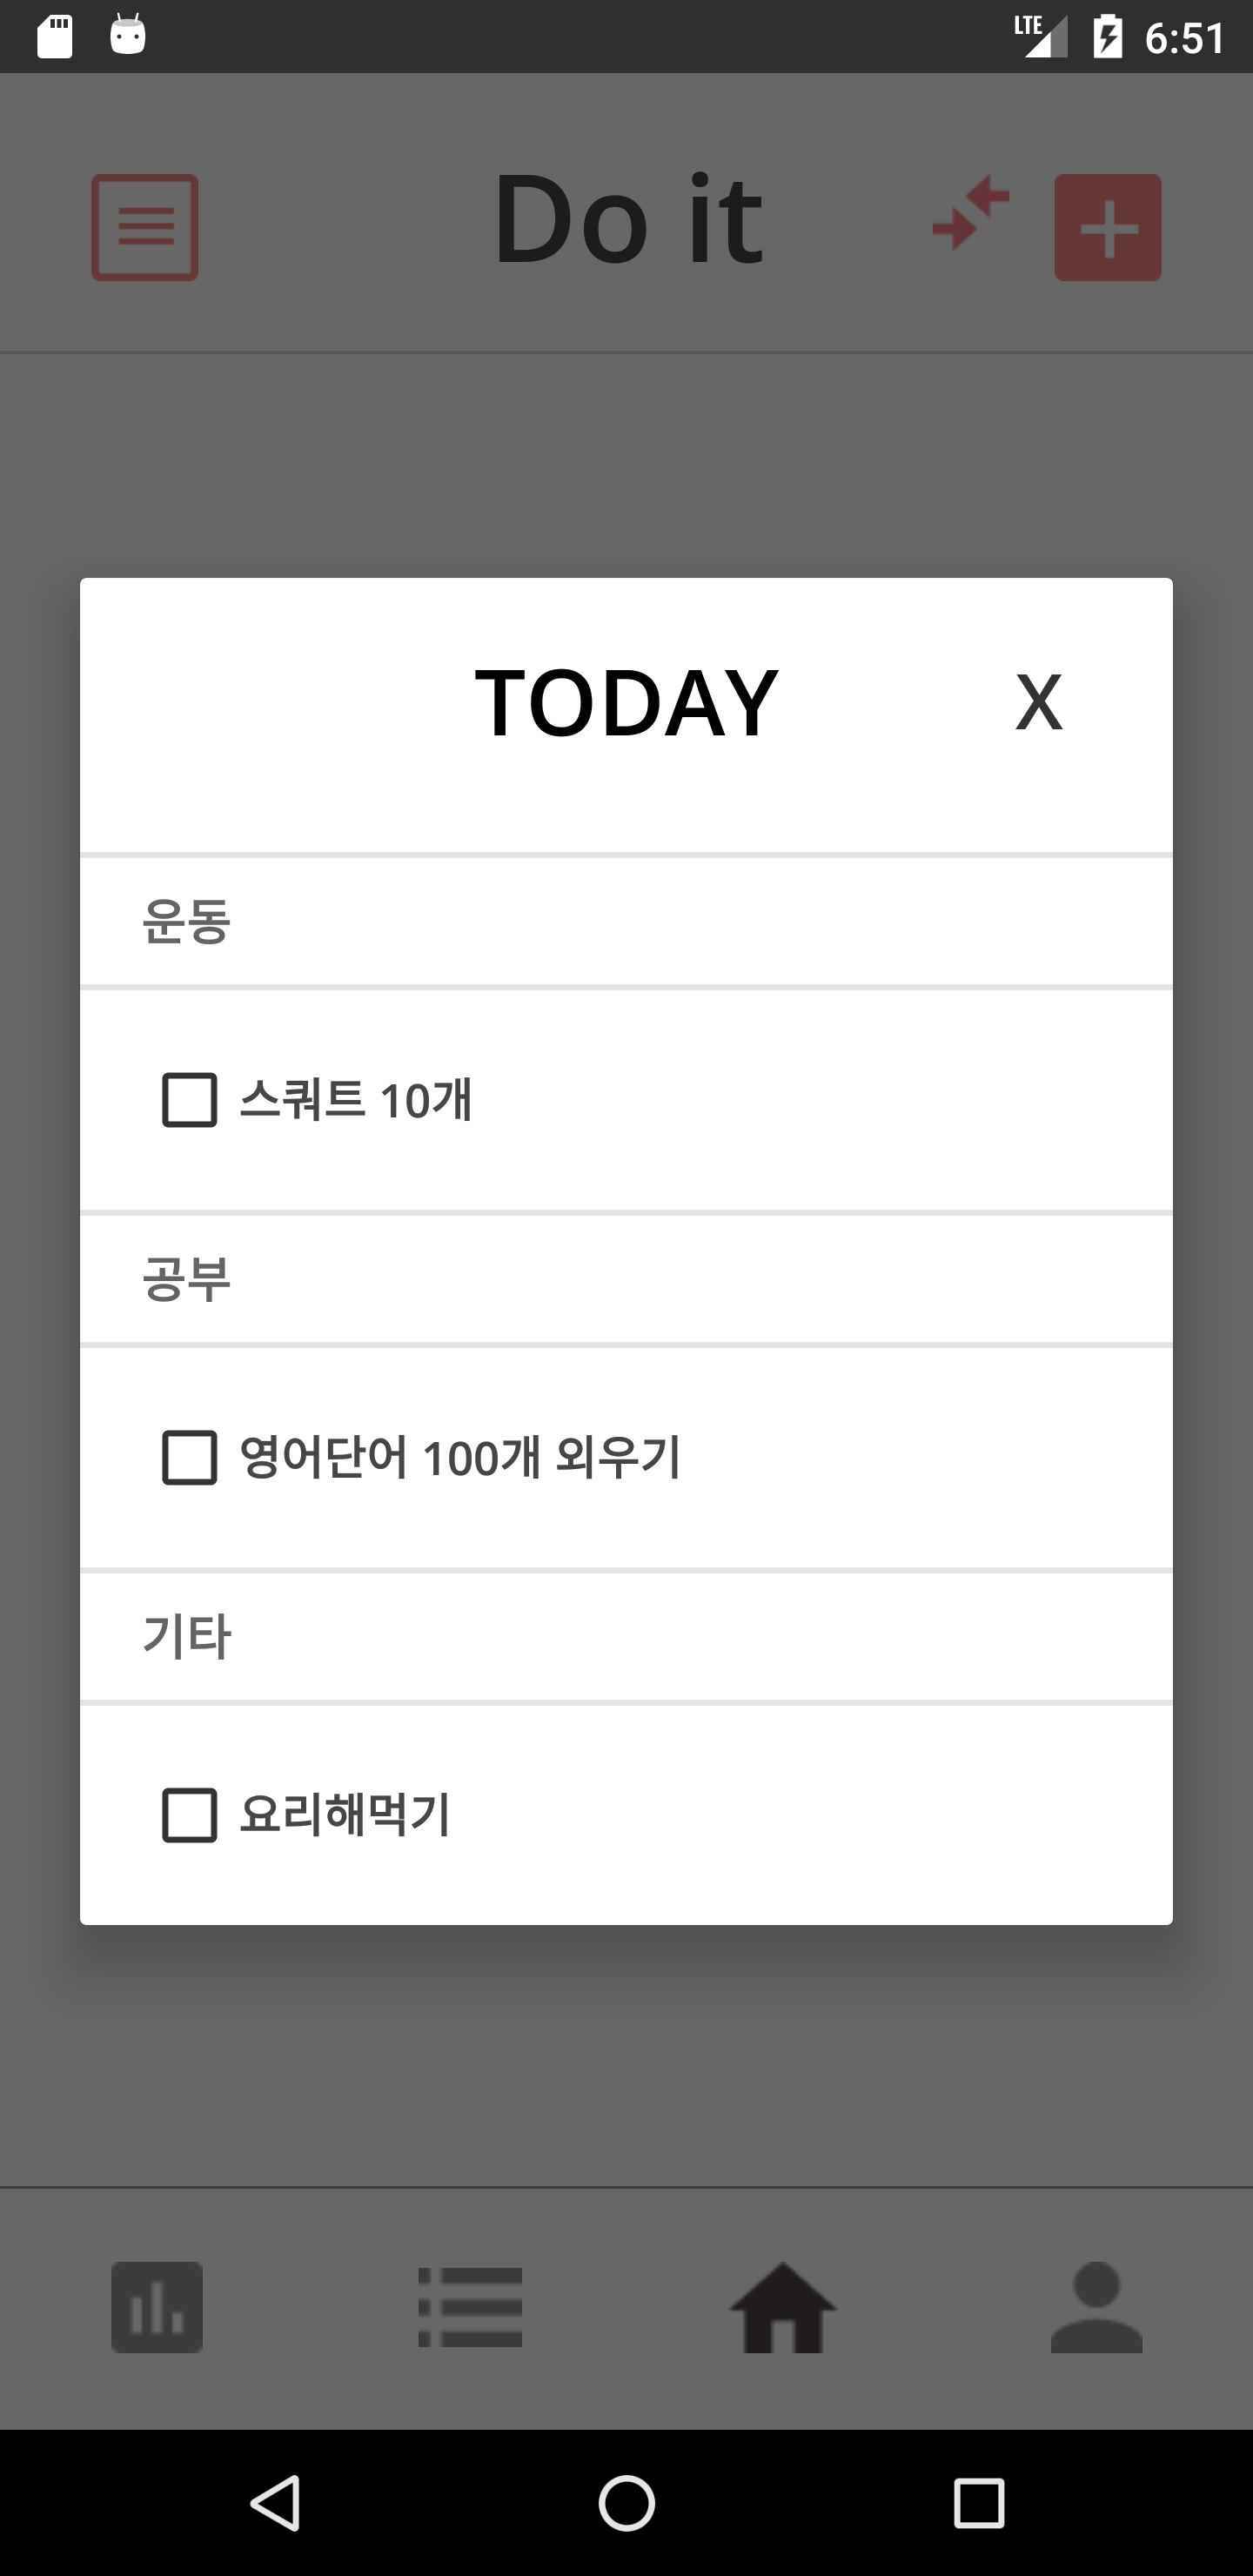
Custom Dialog를 생성해보겠습니다.
저는 Activity에 Button을 하나 생성하여 Button Click 시 Dialog가 나오도록 하겠습니다.
우선 xml에 Dialog를 호출할 Button을 하나 생성하겠습니다.
<ImageView
    android:id="@+id/today"
    android:layout_width="35dp"
    android:layout_height="35dp"
    android:layout_alignParentLeft="true"
    android:layout_marginTop="33dp"
    android:layout_marginLeft="30dp"
    android:src="@drawable/today_icon" />
그리고 custom dialog xml 파일을 새롭게 생성해보겠습니다.
<?xml version="1.0" encoding="utf-8"?>
<RelativeLayout
    xmlns:android="http://schemas.android.com/apk/res/android"
    android:layout_width="match_parent"
    android:layout_height="match_parent">

    <TextView
        android:id="@+id/today"
        android:layout_width="match_parent"
        android:layout_height="80dp"
        android:layout_centerHorizontal="true"
        android:gravity="center_vertical|center"
        android:text="TODAY"
        android:textColor="@color/black"
        android:textSize="30dp" />

        <!--dialog 창 닫기 버튼-->

        <Button
            android:id="@+id/closeButton"
            android:layout_width="wrap_content"
            android:layout_height="80dp"
            android:text="X"
            android:gravity="center_vertical|center"
            android:layout_alignParentRight="true"
            android:textSize="25sp"
            android:background="@android:color/transparent"

            />


</RelativeLayout>
이후 Dialog를 호출할 버튼이 있는 Activity의 class에 가서 onCreate에 해당 코드를 삽입합니다.
override fun onCreate(savedInstanceState: Bundle?) {

        super.onCreate(savedInstanceState)
        setContentView(R.layout.activity_week)

        val today : ImageView = findViewById(R.id.today)

        today.setOnClickListener{
            val todaydialog = LayoutInflater.from(this).inflate(R.layout.today_dialog, null)
            // custom dialog xml 변수에 지정
            val todaybuilder = AlertDialog.Builder(this)
                .setView(todaydialog)
            //  AlertDialog를 생성할 수 있게 해주는 API를 제공
            //  .setView(todaydialog) custom dialog xml에 연결
            val showdialog = todaybuilder.show()
           // 버튼 클릭 시 show
            val closebtn = todaydialog.findViewById<Button>(R.id.closeButton)
            closebtn.setOnClickListener {
                showdialog.dismiss()
            }
            // custom dialog xml에 지정한 dialog 닫기 버튼
        }
 }
이렇게 된다면 기본 Dialog 창은 완성되었을 것 입니다!
여기서 저는 닫기 버튼만 설정해뒀는데 추가적으로 AlertDialog.Builder(this)에서 다양한 함수를 제공하고 있어 편리하게 Dialog의 기능 및 UI를 custom 할 수 있습니다. setTitle, setPositiveButton, setItem, setNegativeButton... 등
저는 추가적으로 Dialog에 CheckBox를 넣어보겠습니다!
custom dialog xml로 돌아가 몇 가지 요소를 더 추가해보았습니다.
<?xml version="1.0" encoding="utf-8"?>
<RelativeLayout
    xmlns:android="http://schemas.android.com/apk/res/android"
    android:layout_width="match_parent"
    android:layout_height="match_parent">

    <TextView
        android:id="@+id/today"
        android:layout_width="match_parent"
        android:layout_height="80dp"
        android:layout_centerHorizontal="true"
        android:gravity="center_vertical|center"
        android:text="TODAY"
        android:textColor="@color/black"
        android:textSize="30dp" />

        <Button
            android:id="@+id/closeButton"
            android:layout_width="wrap_content"
            android:layout_height="80dp"
            android:text="X"
            android:gravity="center_vertical|center"
            android:layout_alignParentRight="true"
            android:textSize="25sp"
            android:background="@android:color/transparent"

            />

    <LinearLayout
        android:layout_width="match_parent"
        android:layout_height="wrap_content"
        android:layout_below="@id/today"
        android:layout_marginTop="10dp"
        android:orientation="vertical">

        <LinearLayout
            android:id="@+id/exercise"
            android:layout_width="match_parent"
            android:layout_height="wrap_content"
            android:orientation="vertical">

            <View
                android:layout_width="match_parent"
                android:layout_height="2dp"
                android:background="#E4E4E4" />

            <TextView
                android:textColor="#646464"
                android:layout_width="wrap_content"
                android:layout_height="wrap_content"
                android:layout_marginLeft="20dp"
                android:textSize="16sp"
                android:layout_marginVertical="10dp"
                android:text="운동" />

            <View
                android:layout_width="match_parent"
                android:layout_height="2dp"
                android:background="#E4E4E4" />

            <LinearLayout
                android:layout_width="wrap_content"
                android:layout_height="wrap_content"
                android:orientation="horizontal">
                <CheckBox
                    android:textColor="#464646"
                    android:id="@+id/exercise1"
                    android:layout_marginLeft="20dp"
                    android:layout_width="wrap_content"
                    android:layout_height="wrap_content"
                    android:text="스쿼트 10개"
                    android:layout_marginVertical="20dp"
                    android:textSize="15sp"
                    android:checked="false"/>

                <TextView
                    android:id="@+id/finish"
                    android:layout_width="wrap_content"
                    android:layout_height="wrap_content"
                    android:textSize="15sp"
                    android:text=" "
                    android:layout_marginLeft="10dp"
                    android:layout_marginVertical="20dp"
                    android:textColor="@color/calendar_day_selected_bg"/>
            </LinearLayout>

        </LinearLayout>


    </LinearLayout>


</RelativeLayout>
위에 CheckBox를 추가하고 CheckBox Click 이벤트를 확인하기 위해 TextView를 하단에 생성했습니다.
CheckBox id : exercise1
TextView id : finish
그리고 다시 dialog setOnClickListener로 돌아와 하단에 해당 코드를 삽입합니다.
val exercise1 = todaydialog.findViewById<CheckBox>(R.id.exercise1)
val finish = todaydialog.findViewById<TextView>(R.id.finish)

exercise1.setOnCheckedChangeListener{compoundButton, b ->
   if(b)
        finish.text = "완료!"
   else
        finish.text = " "
}


이상 Dialog에 대해 알아봤습니다.
P.S : 부족한 부분은 계속해서 수정하겠습니다. 🥰
'🌃Android > UI' 카테고리의 다른 글
| [ Android / Kotlin ] DatePicker 활용하기 ( +Custom) (0) | 2022.01.10 |
|---|---|
| [ Android / Kotlin ] ViewPager, TabLayout을 이용해 메뉴 Tab 구현 ( + Custom ) (0) | 2022.01.04 |


